
F A Q
Q6. about Color
Q6-4. The screen is too dark.
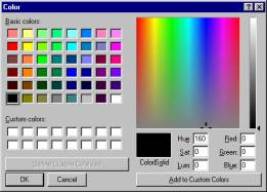
A. You can edit it at the 'color' dialog.
Select one and click 'OK'.
The custom colors are added here.
3. Click 'Add to Custom Color.'
Confirm the color.
2. Adjust the color by scrolling.
1. Select the color which you like.

A. Selecting 'Return to original material' from the comtextual menu can return the color, transparency and glossiness of the element to the original one as saved in the file.
A.It's impossible to edit color on the figure port in real time.
Please peform from the contextual menu in the tree view.
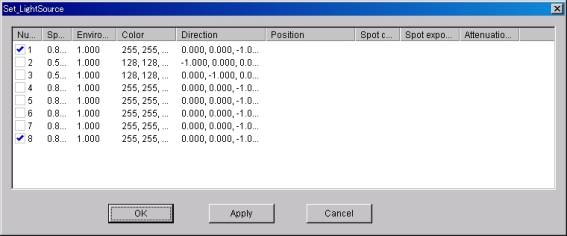
1. 'Set Light Source' from 'Display' in the menu bar, or click 'Set Light Source' button ![]() in the tool bar.
in the tool bar.
2. 'Set Light Source' dialog will be displayed.
Check in the box next to the number which you want to select.
When you click 'Apply', it will be reflected.
You can edit various types of settings in the 'Set Light Source' dialog displayed by double clicking the light source number.

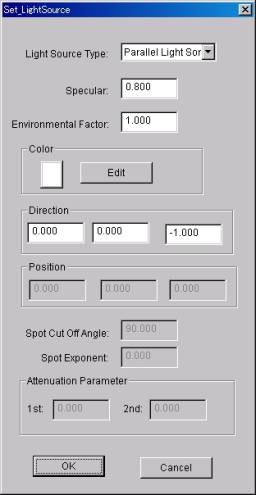
When the value is smaller, it's brighter.
Select from Parallel Light Source, Point Light Source and Spot Light Source.
Numbers from 0 to 1.
Closer to 0 is the darker.
The bigger value supports the larger area.
It's the angle of being lighted.
The bigger value supports the larger area.
To edit the color og light.
The color dialog will be displayed by clicking 'Edit'button.
It's the direction of being lighted.
ex: '0, 1, 0' --> light Y +1
At 'Light Source Type'...
*** When you select 'Parallel Light Source'... set 'Specular', 'Environmental Factor', 'Color' and 'Direction'.
*** When you select 'Point Light Source'... set 'Specular', 'Environmental Factor', 'Color', 'Position' and 'Attenuation Parameter'.
*** When you select 'Spot Light Source'... set all as 'Specular', 'Environmental Factor', 'Color', 'Direction', 'Position' 'Spot Cut Off Angle', 'Spot Exponent' and 'Attenuation Parameter
'Inclination Measurement & Color Display' dialog will be displayed
by selecting 'Incline Color Display' from 'Operation' in the menu bar,
or clicking 'Incline Color Display' button ![]() in the tool bar.
in the tool bar.
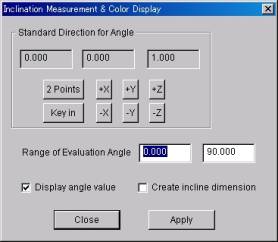
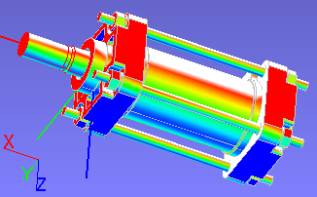
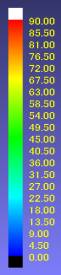
It decides the inclination based on 'Standard Direction for Angle'..
For example, when the value is '0, 0, 1', the inclination is decided based on Z axis as above.
'Standard Direction for Angle'.will be based on X axis after clicking '+X' button and 'apply' button.
Or you can indicate by '2 Points' button or 'Key in' button.
Also the color displey of angle is possiple to be changed by changing the value of 'Range of Evaluation Angle'.
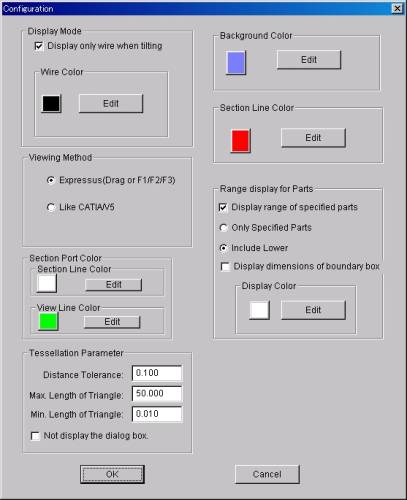
A. It can be changed by 'Background Color ' in the 'Configuration' dialog.
The 'Configuration' dialog. will be diplayed by 'Configuration' from 'Set'
in the tool bar, or clicking 'Configuration' button ![]() in the tool bar.
in the tool bar.
The color dialog will be displayed by clicking 'Edit' button, so edit the background color there.
Also, 'Display Mode', 'Viewing Method', 'Section Port Color', 'Tessellation Parameter', 'Section Line Color'and 'Range Display for parts' can be edit.
A.It's shown in 'Standard Direction Angle' in the 'Inclination Measurement
& Color Display' dialog.